
Step-by-Step Setup Guide for the Blackmagic Design ATEM Mini Pro ISO
The Blackmagic Design ATEM Mini Pro ISO redefines live production switchers with its compact, feature-packed design. This guide simplifies the configuration process.
Begin by setting up. Connect inputs, manage audio, and enable ISO recording. This initial phase ensures your setup runs smoothly.
Next, enhance your broadcasts. We cover advanced settings to optimize performance, crucial for live concerts, streaming conferences, or online content creation.
Finally, tackle common issues. Tips and tricks included in this guide help maintain seamless operations.
By following these steps, you'll get used to the ATEM Mini Pro ISO, improving your production quality with ease.
Step 1: Unboxing and Inspection

You can start with the ATEM Mini Pro ISO by starting with the unboxing. As you open the box, take the time to thoroughly examine each component that comes with it.
This includes the main unit of the ATEM Mini Pro ISO, its power adapter, necessary HDMI cables, and any additional accessories included in your purchase.
It's important to confirm that all expected items are present and in good condition. This initial inspection is not just a routine check but a crucial first step in familiarizing yourself with the capabilities of your new equipment.
Enjoy this process as you prepare to use the full potential of your ATEM Mini Pro ISO for your creative projects.
Step 2: Connect Power and Video Sources

Start your ATEM Mini Pro ISO setup by securely attaching the power cable to the unit and plugging it into the nearest power outlet. This initial step powers up your equipment, setting the stage for a dynamic video production session.
Next, it's important to connect your cameras or any HDMI-compatible devices directly to the HDMI inputs on the switcher. Using high-quality HDMI cables for these connections isn't just a suggestion, it's a necessity to make sure a flawless video transmission.
Whether you're integrating professional cameras or simpler HDMI-enabled devices, the right cables make all the difference in maintaining signal integrity and quality.
Planning to present your video creation to a broader audience? Expand your reach effortlessly by utilizing the HDMI output on your switcher. Connect it to external displays or projectors with the same attention to cable quality.
This strategic setup not only improves your ability to manage live feeds during events but also makes sure that every frame looks as clear and professional on big screens as it does on your control monitor.
This streamlined approach not only facilitates a smooth integration of video sources but also elevates your production capabilities, whether you're broadcasting live, recording future content, or experimenting with innovative video mixing techniques.
By prioritizing connection quality and strategic setup, you're well on your way to creating engaging and professional video productions that captivate and communicate effectively.
Step 3: Connect Audio Sources

Setting up your ATEM Mini Pro ISO for high quality audio is simple. Just follow these steps to connect your gear and get exceptional sound.
- Identify Your Gear: List all your audio devices like dynamic mics, condenser mics, mixers. This helps you figure out which cables and connectors you need.
- Choose Cables and Connectors: You'll need specific cables, like XLR for mics or RCA for mixers. Pick high-quality ones to improve sound and reduce noise.
- Connect Devices: Attach each cable to your ATEM Mini Pro ISO. Make sure they fit well to avoid issues during use.
- Set Audio Levels: Turn on your gear and tweak the settings. Adjust mic gain to prevent distortion and balance mixer outputs for clear sound.
- Test Everything: Do a sound check before you start. Record some audio or run a test stream. Adjust levels as needed to get the best sound.
- Monitor and Adjust: Keep an eye on audio levels while you work. Be ready to fix any sudden changes or problems.
By following these steps, your setup will be perfect for recording or streaming with professional audio quality.
Step 4: Set Up Network and Control

The ATEM Mini Pro ISO offers new levels of control in video production. Connect it to your network with an Ethernet cable, and manage your setup remotely. Now you can adjust settings or switch inputs from anywhere with network access.
This flexibility boosts your productivity, freeing you from staying close to your gear.
For those who like hands-on control, you can also directly connect the switcher to a computer. This setup allows for quick, real-time changes, keeping your production smooth and responsive.
Whether streaming live or handling multiple cameras, the ATEM Mini Pro ISO adjusts to your needs, helping you meet professional video production standards effortlessly.
Step 5: Configure Settings and Update Firmware

To get the best out of your ATEM Mini Pro ISO for any production, start with a simple step: after powering it on and head straight to the settings menu. Here’s where the magic begins, letting you setup each aspect to fit your production's needs perfectly.
First up, tackle the video settings. Adjust the resolution and frame rate to match the quality and fluidity you're after. Whether you’re broadcasting a live event or recording in a studio, these tweaks make a big difference.
Now, let’s talk audio. The clarity of your sound is key, so spend some time fine-tuning the audio levels. Play around with the settings to see what works best in your space. Getting this right means everyone hears everything crystal clear.
Next on your list? The switcher options. These are crucial for managing live inputs and smooth transitions. Customize them to your liking to improve control and boost your production’s value.
Don’t forget about firmware updates, either. Staying updated means your equipment performs optimally, packed with the latest features and fixes.
By methodically adjusting these settings, you make sure high quality quality and efficiency in your productions, ready to take on various broadcasting challenges.
Step 6: Test and Calibrate

Before you start your live production with the ATEM Mini Pro ISO, it's critical to check everything. Start by thoroughly testing each function to make sure it works perfectly.
Look into the audio and video feeds. Make sure the switcher is combining them without any problems.
Tune the audio carefully. You want perfect balance and clear sound. Check the video too. It should be sharp and detailed, meeting professional standards. Make sure every device connected is working well. This is key for a smooth show.
This prep is your safety net. Fix any issues now, and you'll have a live show that runs smoothly, without any hitches. This keeps your standards high, which makes your audience happy and builds their trust in what you do.
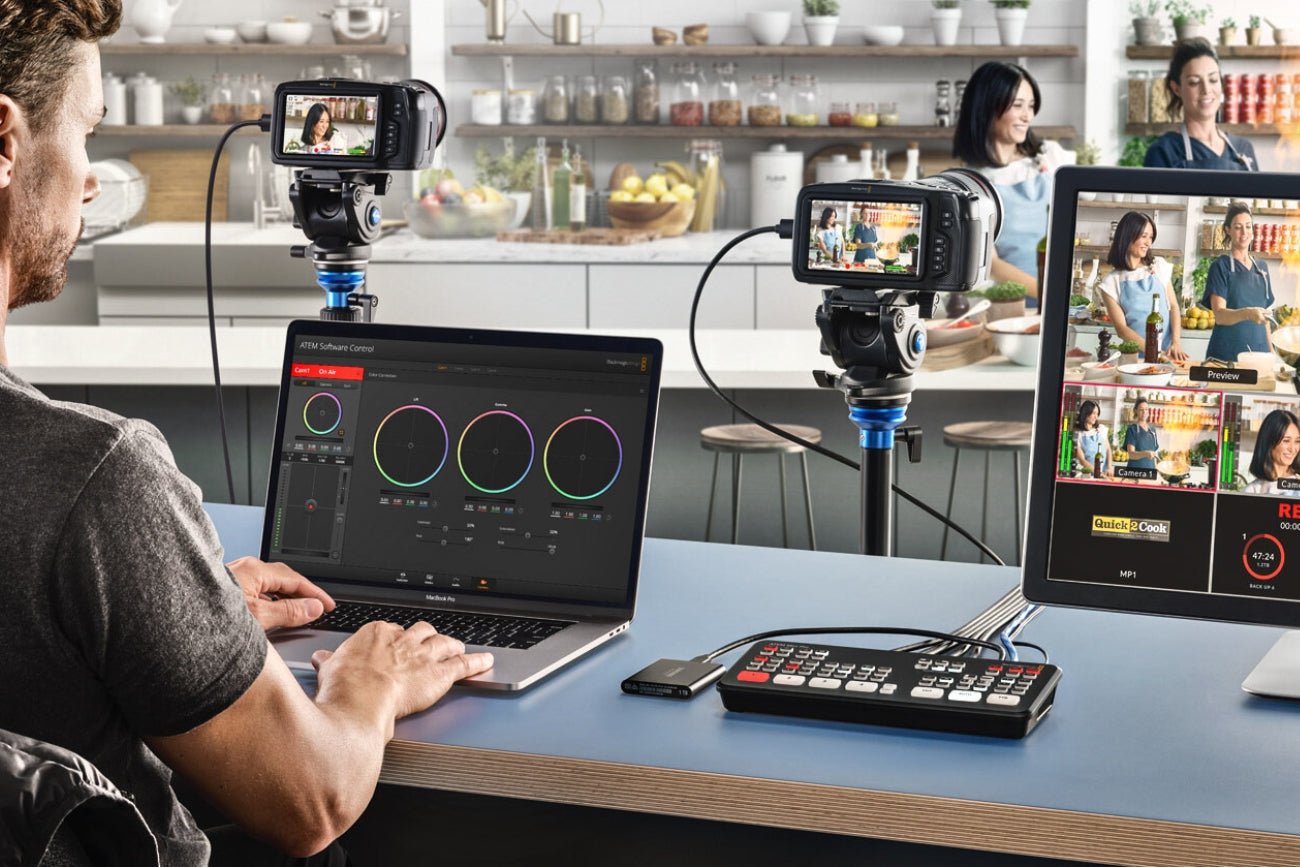
Step 7: Familiarize Yourself with the Control Panel and Software
Experiment with every button, dial, and switch on your switcher. Getting hands-on is not just about learning the layout—it's important for improving your live production skills. You'll gain the ability to make your broadcasts more precise and effective.
Don't just stick to the hardware. Use the ATEM Software Control too. It mirrors the switcher’s interface on your computer, allowing you to adjust settings and manage your workflow from afar. Integrating physical and digital controls smooths out your production and boosts professionalism.
This strategy lets you manage live situations with greater creativity and confidence, enhancing what you can achieve in live production.
Congratulations on your new Blackmagic Design ATEM Mini Pro ISO! This device is your key to high-quality live productions, far beyond simple camera switching.
The ATEM Mini Pro ISO boasts a solid hardware streaming engine. It's perfect for live concerts, webinars, or engaging gaming streams, enhancing your output with sharp transitions and comprehensive camera control.
Here are essential tips for using your device:
- Pre-Set Macros: Automate tasks to streamline operations during events.
- Utilize Multiview: Monitor all camera angles at once to keep every action in view.
- Record ISO Files: Capture individual feeds for straightforward editing later.
Look into the manual for additional features that can improve your broadcasts. Test various settings and configurations to match your production style. Each function is designed to enhance your storytelling.
2 comments
Allen Matthews
Can you provide a method to use a GoPro Hero 12 in the mix on the ATEM SDI Pro ISO?
Can you provide a method to use a GoPro Hero 12 in the mix on the ATEM SDI Pro ISO?
Ashokkumar
hi
hi